Email functionality can be useful for each of the different user roles within CourseMill. In general, the type of emails available to each type of user is as follows:
Can receive course/curriculum specific email notifications; i.e. when the student is enrolled in a course/curriculum, removed from a course, or on or removed from a wait list. Students also receive notifications for when a course/curriculum is about to start, or after a course/curriculum is completed and a certificate is waiting.
Can email the instructor if one is set up for a course
Can email all students within a course or session.
Can email all students listed on a report.
Can email students posting entries in a discussion board
Can have Report Locker reports automatically sent to them as a copy recipient.
Can email all their assigned students listed in a report.
Can have Report Locker reports automatically sent to them as a copy recipient.
Can be copied on all users’ notifications, if reporter has the rights to the student.
Can email all students listed within a report.
Can email all students within a course or curriculum.
Can have Report Locker reports automatically sent to them and additional reporters.
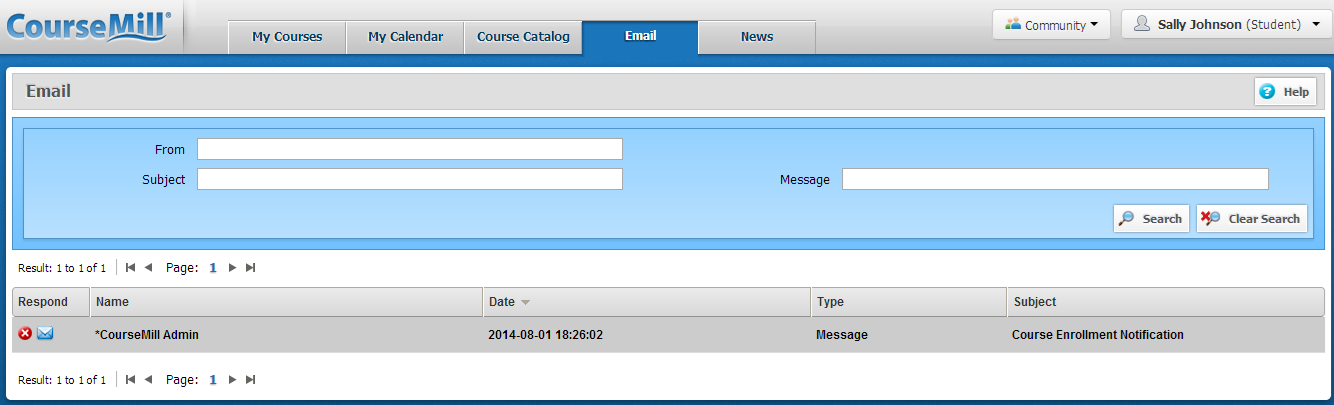
This is an email account inside CourseMill that is associated with the CourseMill log-in and can only be accessed within the CourseMill interface. Emails can only be shared amongst users within CourseMill, and users are required to log into CourseMill to compose, send and retrieve emails. Availability of internal email within CourseMill is indicated by the Mail tab on the user interface.

|
If you use this type of email support, notifications and email reports could be less effective as users will need to be signed in to CourseMill to see their messages. |
For the global admin to set up the internal email, the following must be performed:
Expand the Admin Tasks from the left navigation menu and select Manage Orgs.
Click View/Edit Details for the Organization.
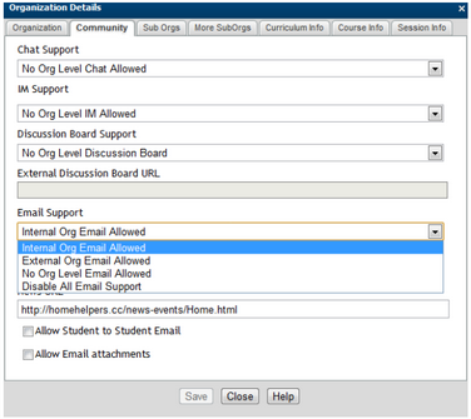
Select the Community tab in the pop-up window.
For the Email Support item, select the value Internal Org Email Allowed from the list.
Selecting no email support disables all notifications, scheduled reports in the Report Locker and email communications at the organizational level.
For the global admin to set up the internal email, the following must be performed:
Expand the Admin Tasks from the left navigation menu and select Manage Orgs
Click View/Edit Details for the organization.
Select the Community tab in the pop-up window.
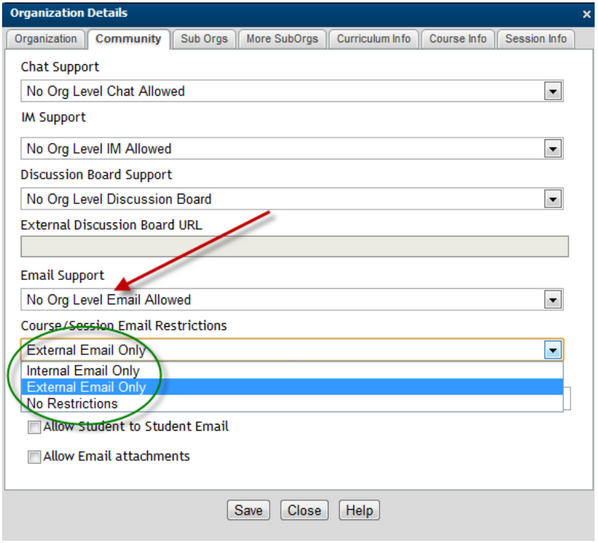
For the Email Support item, select the value No Org Level Email Allowed from the list.
If you choose no email at the organization level, you then have the ability to choose what type of email you would like at the course/session level as shown below for the item Course/Session Email Restrictions.
When external email is specified, the CourseMill system sends emails and notifications to and from the email address specified in each user profile. This email address is an external email account that ties in with the organization’s existing email server and accounts. Ex: john.doe@trivantis.com. Emails are relayed through your SMTP server. When this option is selected, be sure your CourseMill configuration file has been properly configured to relay the messages (see below).
For the global Admin to set up the internal email, the following must be performed:
Expand the Admin Tasks from the left navigation menu and select Manage Orgs.
Click View/Edit Details for the organization.
Select the Community tab in the pop-up window.
For the Email Support item, select the value External Org Email Allowed from the list.
Return to Admin Tasks and select Manage Properties.
Find the property Category of Chat, Bulletin Board & Email Settings and fill out all the SMTP properties as they pertain to your SMTP server.
| Property | Description | Values |
|---|---|---|
| SMTPPassword |
Specifies the password used for SMTP |
|
| SMTPPort |
Specifies the port used by the SMTP |
|
| SMTPRetryCount |
Specifies the number of times to retry a failed send-mail request to the SMTP server. |
2 (default) |
| SMTPSendBulkToAsBCC | Specifies whether to send emails as blind carbon copies (BCC) when sending emails to a list of recipients. |
1 = Send as BCC (default) 0 = Do not send as BCC |
| SMTPSendCopyAsBCC |
Specifies whether to send emails as blind carbon copies (BCC) when sending carbon copies of emails. |
1 = Send as BCC 0 = Do not send as BCC (default) |
| SMTPServer |
Specifies the SMTP sever name that handles sending of external email. |
|
| SMTPUsername |
Specifies the username used for SMTP authentication. |
Disabling all email support will disallow any emailing at all levels of the organization; org, course, and session.
For the global Admin to set up disabled email, the following must be performed:
Expand the Admin Tasks from the left navigation menu and select Manage Orgs.
Click View/Edit Details for the organization.
Select the Community tab in the pop-up window.
For the Email Support item, select the value Disable All Email Support from the list.
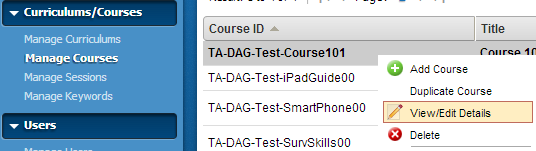
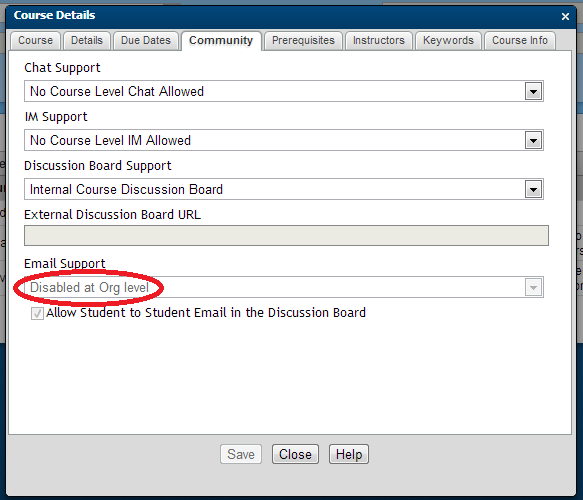
To verify that course level emails are automatically disabled, select Manage Courses, right-click on a course and select View/Edit Details from the drop-down list.
Under the Community tab, you can see that the Email Support item has the value of Disabled at Org level and is protected from being changed at the course level. The same can be seen at the session level.
Below you will find each individual type of email, who has permission to send the email, and how to set up that specific configuration.
| What can be sent | Student | Instructor | Reporter | Admin | How to make it happen | ||
|---|---|---|---|---|---|---|---|
| Send email to any student listed on a report | √ | √ | √ | When a report is run that lists students, the Mail Students From Report button is displayed in the top navigation bar. | |||
| Send email to instructor of the course | √ | Click the blue Mail icon to the right of the course in the My Courses section of the student interface. Once clicked, an email dialog box is displayed | |||||
| Send email to some/all students enrolled in a course or session | √ | √ | When in Manage Courses or Manage Sessions, select the course or session and select the Mail tab on the top navigation bar to email all students enrolled. | ||||
| Reporters can have progress reports emailed to them | √ | Admins will need to go to Manage Users > View/Edit Details > select user > check schedule for progress reports. See screen shot below. These are scheduled in Manage Scheduled Tasks or reports that have been set up and scheduled in the Report Locker. | |||||
| Reporters can receive copies of all student’s notifications | Those who have access to Manage Users will go to View/Edit Details > select user > check CC student emails if that User is a Reporter (See screen shot below) | ||||||
| Run a report on a schedule and have it emailed to you | √ | √ | √ | Run your report > click Save to Report Locker > Reports > Report Locker > select report > View/Edit Details > set the report to run and be emailed to you on a schedule. | |||
| Run a report on a schedule and have it emailed to you and other instructors or reporters. | √ | √ | Run your report > click Save to Report Locker > Reports > Report Locker > select your report > View/Edit Details > set the report to run on a schedule, select recipients of the copy of the report. | ||||
| Send email another student that has posted in the Discussion Board | √ | √ | √ | √ | Admin Tasks > Manage Org > Community > check Allow Student to Student Email box. | ||
| Email attachments | √ | Admin Tasks > Manage Org > Community > check Allow Email Attachments box. Note: If you allow attachments, but do not allow student-to-student emails, your students can still send emails with attachments to the instructors of their courses. This can include assignments, or required paperwork for participating in a course. | |||||
| All notification emails | √ |
All org Level and curriculum level emails generated from a notification setting will come from the administrator email address specified in the manage property AdminEmail. Notifications for courses are emailed from the instructor.
|
Reporters can receive copies of all students’ notifications as mentioned above using the following check box:

Support | About Trivantis
© Copyright Trivantis Corporation 2016