
CourseMill offers automated notification processing at the organization, curriculum, course, and session levels. The CourseMill email management service must be enabled for notifications to function. Notifications will be sent as an email message to the email address listed in the user profile if the system is set up for External Email support. If email is set up for Internal Email, the email message will be sent to the User ID in the CourseMill Mail tab in the student user interface. In this case, you will have to handle the Forgotten Password notification differently.
|
|
If the typical user does not have an email, use the manager’s email in the student’s profile to alert or distribute the messages or set CourseMill email to be ‘Internal Only” allowing the user to read email messages when they log in. |
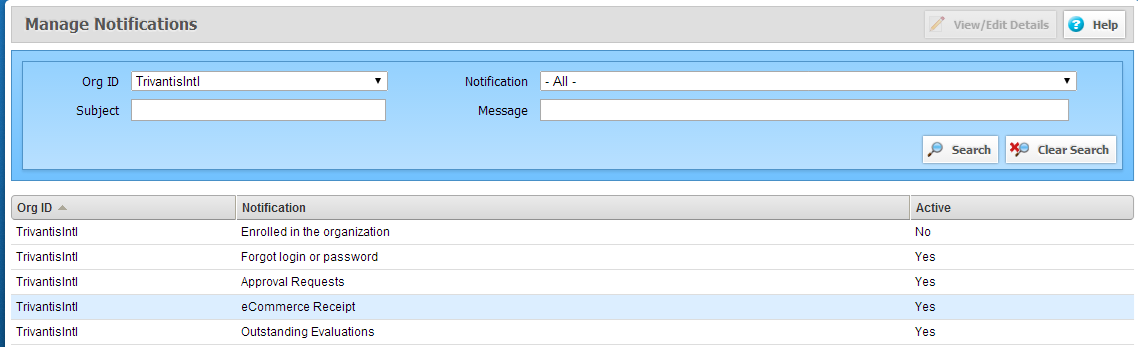
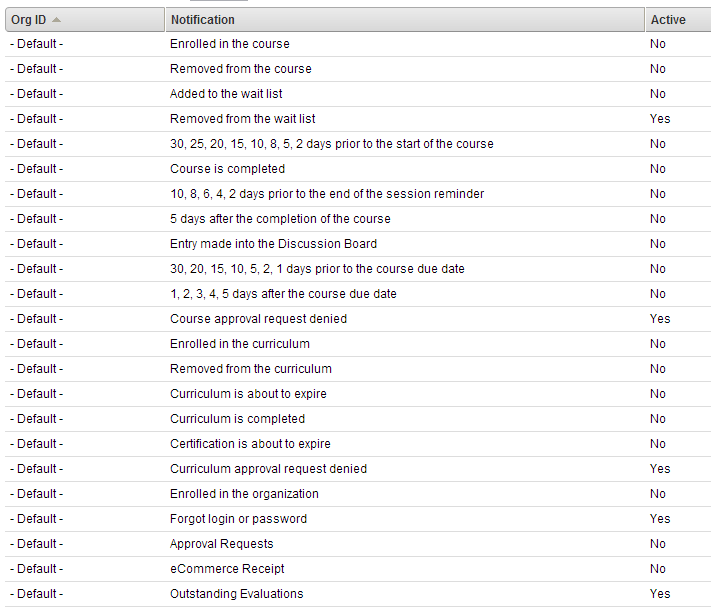
The Organization has five unique notification messages that could each be delivered by email if the Active check box is checked when editing the notification message. The five types are:
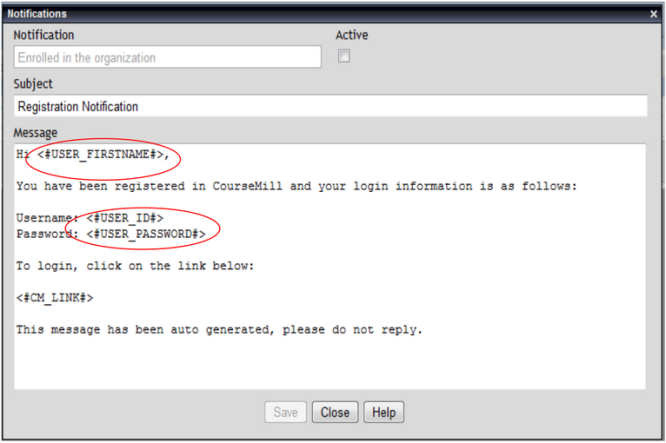
Enrolled in the Organization – sent to the user when the new user is created; contains their login credentials.
Forgot Login or Password – activates the “Forgot your UserID or Password” button on the Login screen. When clicked, this notification will be sent to a user..
eCommerce Receipt – sent to the student when the student makes a purchase.
Approval Requests - a nightly list of approval requests that is sent to the student's manager when a student has tried to enroll in a course or curriculum requiring prior approval.
Outstanding Evaluations – sent to the instructor when there are pending course evaluations to be completed before allowing the student to continue.

|
Approval Requests will function only if:
|
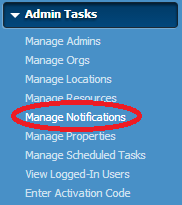
Organizational notifications are managed by admins by using the Manage Notifications area under Admin Tasks section.
When you click Manage Notifications and select the proper Org ID, the following screen displays the five notifications:
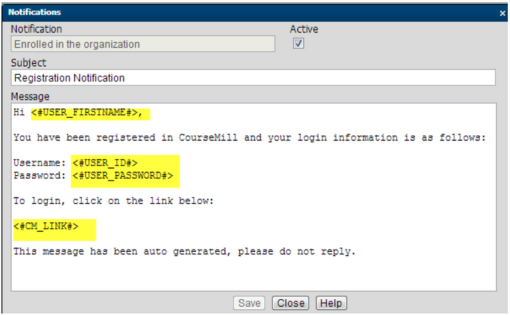
To modify the contents of each notification, select one of the five, and click View/Edit Details. A screen similar to the one below will appear:
|
|
|
|
Email notifications are set to come from the Administrator defined in Managed Properties if the notification is one of the organization notifications, one of the curriculum notifications, or one of the notifications of a course if no instructor is set up. This admin is used across all organizations. The following administrator settings of AdminEmail and AdminName are what will be seen in the From portion of the notification email. Be aware that if there is more than one organization within your site, these settings will be seen across all the organizations so you may want to add the organization name within the body of the email notification text or subject line.
|
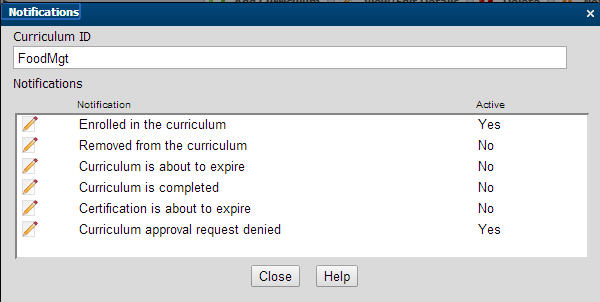
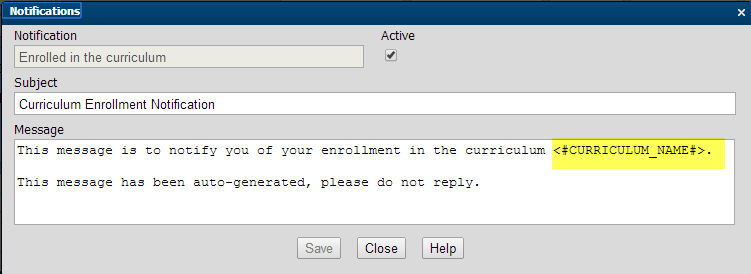
There are six types of curriculum notifications. These can be managed in the Manage Curriculums area by highlighting the specific curriculum and then clicking the appropriate notifications button. Once you click this, the following screen will display:
|
|
|
Variables are field names that can be pulled from the database to personalize messages. Data pulled from the database will be placed in the associated variable names as highlighted in this example. |
Select Help to view a complete list of available content variables and their exact spelling
|
|
The Curriculum is Completed Notification is what drives a physical paper certificate to be created for a curriculum. The curriculum could use the standard certificate or one specific to it. In order to print one specific to the curriculum, a PDF file named the same as the Curriculum ID must have been loaded on your server. (See Working with Certificates for more detail.) |
If the curriculum notifications are activated, four of the six notifications are sent immediately upon the corresponding action. For example, when a student is enrolled in a curriculum the corresponding notification is sent immediately. This is true if the instructor/administrator performs the enrollment or the user self-enrolls. This is also true if existing users are Auto-Enrolled as well as future students that will match the auto-enrollment rules.
However, the other two notifications are scheduled for distribution by setting up a managed property telling CourseMill how many days from the curriculum date to send the notification. They are physically sent during the nightly Notification Maintenance run (Admin Tasks > Manage Scheduled Tasks > Notification Schedule).
These two schedule notifications are shown below with their corresponding managed property that the administrator will need to set up.
| Notification | Managed Property | ||||
|---|---|---|---|---|---|
| Certification is about to expire |
CertificationExpirationDays – The date the student gets the notification is calculated by taking the Certification Expires in Days field (entered on the Curriculum Tab as shown earlier in this document) and subtracts the number of days in this Managed Property. For example:
|
||||
| Curriculum is about to expire |
CurriculumAccessDays - The date the student gets the notification is calculated by taking the Student Must Complete in (days) field (entered on the Curriculum Details tab and subtracts the number of days in this Managed Property. This is only sent out if the curriculum is not yet completed. For example:
Once the student reaches the 90 days, he or she will no longer have access to the curriculum. |
|
|
The expiration date is not retained until the notification of the expiration is executed. This is only important to know if you are creating reports with this field in it. It will show blank on the report until the notification goes out. |
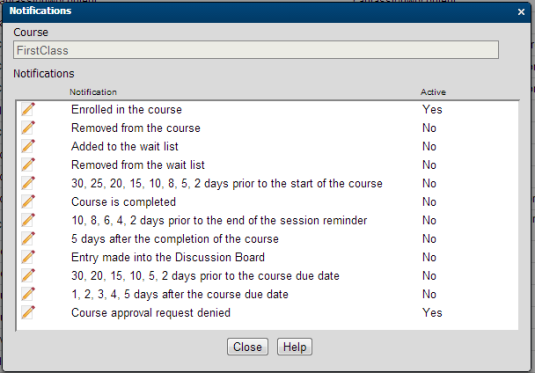
There are 12 types of course notifications.
|
|
||
|
|
The Course is Completed Notification is what drives a physical paper certificate to be created for a course, if one exists. The course could use the standard certificate or one specific to it. In order to print a certificate specific to the course, a PDF file named the same as the Course ID must have been loaded on your server. (See Working with Certificates for more detail.)
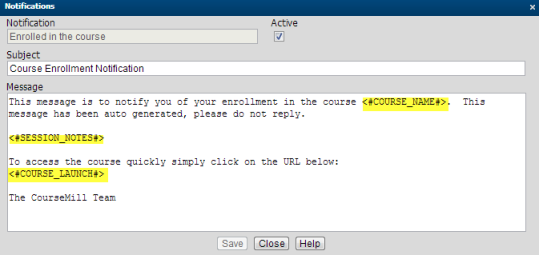
The Enrolled in the Course Notification can be sent with an ICS file as an attachment so the user can click on it and add the session date to their outlook calendar. This is done by setting a managed property CreateCalendarEventFiles to Yes. This only works if you have a session start and end date.
The managed property CalendarReminderTime can be set to specify in minutes when the calendar alarm warning notice will activate in Outlook prior to the beginning of a scheduled class starting time. This only works if you have a session start date and time set.
The Entry Made in Discussion Board Notification sends an email to the course instructor as well as anyone else who posted in the discussion board.
Notifications that are turned on at the session level override notifications at the course level. Notifications that are turned off at the session level are overridden by the course level notifications.
The CourseMill email management service must be enabled for notifications to function. If your system is using an External Email service, the notifications will be mailed to the email address specified in the User profile. If the system is using the Internal CourseMill email service, the notifications will be displayed in the users Mail tab on the student interface.
|
|
If the typical user does not have an email address, use the manager’s email in the student’s profile to alert or distribute the messages OR set CourseMill email to be Internal Only allowing the user to read email messages when they log in. |
If turned on, seven of the 12 notifications are sent immediately upon the corresponding action. For example, when a student is enrolled in a course, the corresponding notification is sent immediately. This is true if the instructor/administrator performs the enrollment or the user self-enrolls. This is also true if existing users are Auto-Enrolled as well as future students that will match the auto-enrollment rules.
However, the other five notifications are scheduled for distribution by setting up a managed property telling CourseMill in how many days it should send the notification. They are physically sent during the nightly Notification Maintenance run (Admin Tasks > Manage Scheduled Tasks > Notification Schedule). These five are shown below with their corresponding managed property that the administrator will need to set up.
| Notification |
Managed Property |
|---|---|
| Nn,nn,nn,nn prior to the start of the course |
CourseNotificationDays – specifies the nn values |
| Nn,nn,nn,nn prior to end of session reminder |
SessionEndWarningDays - specifies the nn values |
| Nn days after completion of the course |
SessionFollowUpDays - specifies the nn values |
| Nn,nn,nn,nn prior to the course due date |
DueDateApproachingDays - specifies the nn values |
|
DueDateWarningThresholdDays – specifies the number of days prior to the due date that the Yellow/Red visuals show up in the My Courses area |
|
| Nn,nn,nn,nn after the course due date |
DueDatePassedDays - specifies the nn values |
The CourseMill notification system provides for customized messages for an organization, curriculum, course or session. Messages may be plain text or HTML and can be modified to meet your needs. A sample template that comes with the system is shown below.
Notice the system variables that you can use designated by <#xxxxxxxxx#>. In the case below the system will automatically insert the user’s first name to personalize the message. Then the system will insert the user’s ID and password automatically, as well as the link to CourseMill. Later in this document you will see all the system variables that are available to you for use in notifications.
Since all notifications are initially set up as basic templates, it is best to revise all those templates in one administrative session so that you don’t have to change them for each course, curriculum, or session.
These templates appear on the Manage Notifications page as defaults. These templates will only display if you have the organization set to ALL (which is usually only available to the global administrator of CourseMill), which means the templates are set up for your entire database crossing all organizations. They can still be later modified at the lower course/curriculum/session levels.
When setting a template/default notification Active, it will make the same notification active for any new organization, course, curriculum or session. For example, if the Course approval request denied notification is made Active, any time a new course is created, this notification for that course will also be made active. If there is a course for that organization that you want for it not to be active, you will have to change that specific course’s notification.
The system variables for specific organization, curriculum, course, or session fields that you code in the notification email must be spelled exactly as shown below.
| Text-Variable | Replacement text |
|---|---|
| <#START_DATE#> | Start date of the course or curriculum |
| <#END_DATE#> | End date of the course or curriculum |
| <#LOCATION#> | Location of the course or curriculum |
| <#LOCATION_DESCRIPTION#> | The description of the location |
| <#COURSE_NAME#> | Name of the course |
| <#CURRICULUM_NAME#> | Name of the curriculum |
| <#SESSION_NAME#> | Name of the session |
| <#INSTRUCTOR_NAME#> | Name of the instructor |
| <#USER_ID#> | Student's user ID |
| <#USER_FIRSTNAME#> | Student's first name |
| <#USER_LASTNAME#> | Student's last name |
| <#USER_FULLNAME#> | Student's full name |
| <#USER_PASSWORD#> | Student's password |
| <#USER_SUBORG0#> thru <#USER_SUBORG15#> | Defined sub-org values |
| <#USER_PERSINFO0#> thru <#USER_PERSINFO7#> | Defined user definition values |
| <#APPROVER_NAME#> | Name of the person that approved the student |
| <#DENIED_COMMENT#> | Comment provided for denied approval |
| <#CM_LINK#> | CourseMill Log-in URL |
| <#MEETING_DAYS#> | Days of the week that the session meets |
| <#START_TIME#> | Session start time |
| <#END_TIME#> | Session end time |
| <#COURSE_NOTES#> | Course notes |
| <#COURSE_DESC#> | Course description |
| <#COURSE_LAUNCH#> | URL that allows the student to log-in. When the student is logged in, the course is automatically launched. This is encrypted to protect the username and password. |
| <#SESSION_NOTES#> | Session notes |
| <#WAITLIST_POSITION#> | Position on the waitlist, if enabled |
| <#CREDIT_HOURS#> | Number of credit hours earned |
| <#COMPLETION_DATE#> | Course completion date |
| <#DUE_DATE#> | Course due date |
| <#DB_NAME#> | Database name |
| <#TOPIC_NAME#> | Discussion board topic name |
| <#TOPIC_ENTRY#> | Discussion board topic entry |
| <#TOPIC_POSTER#> | Name of the discussion board topic poster |
| <#SCORE#> | Score for the course |
| <#PURCHASE_DATE#> | Date of purchasing the course |
| <#FOREACHITEM#> | Number of items purchased |
| <#CATALOG_TYPE#> | Type of course catalog |
The standard CourseMill notifications in text can be created as HTML notifications if you wish to incorporate images, various fonts, colors, etc. To utilize images in HTML notifications, you will need to upload the image files into CourseMill first by performing the following steps:
Create a new organization called Images.
On the Add Organization or Organization Details page, there is an item called Organization Logo where logo image files are uploaded. This is where additional image files can be uploaded for use in notifications.
Load up your image file and pay close attention to the URL that is automatically generated for you. This is the link you will use in your HTML notification. It is a good idea to store these URLs where you will not lose them, but all of them will actually be the same except for the actual file name of the image.
Load up as many images as you want and track the URLs that are generated.
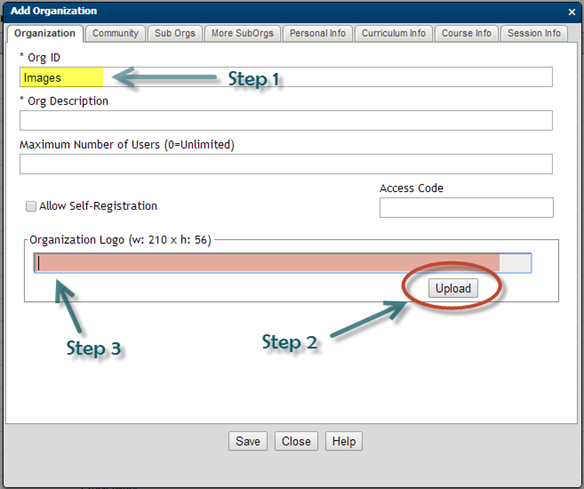
Here is a sample HTML line in a notification that pulls in an image. The URL shown here is an example of what would be in the Organization Logo item seen in Step 3 of the screen snapshot above.
<p><img src="https://companytraining.trivantis.com/shared/cmonline2/course/orglogos/example-logo.jpg" width="195" height="56" /></p>
Support | About Trivantis
© Copyright Trivantis Corporation 2016
