View this guide to learn the steps involved in creating a custom user log-in/registration page using Lectora.
The steps are different depending on the version of Lectora you are using:
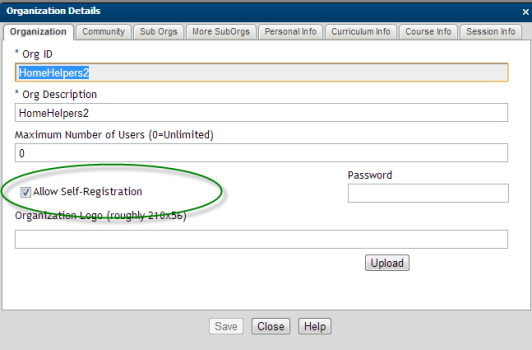
In CourseMill’s Organization Setup, if a client allows Self-Registration as shown below:
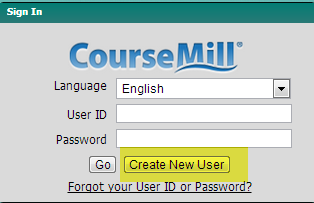
Then CourseMill’s standard login page will contain a Create New User button to allow new users to set themselves up in CourseMill.
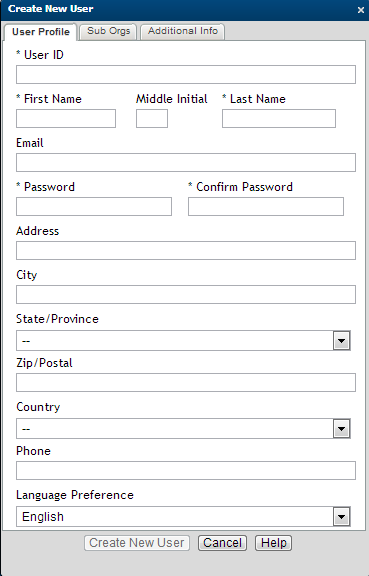
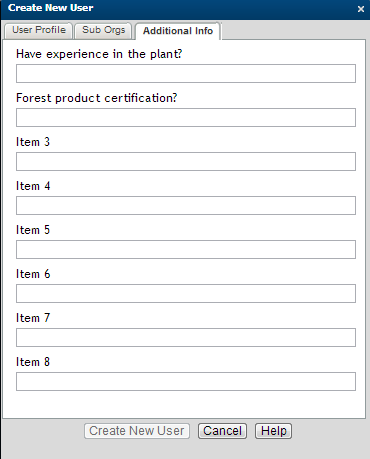
Once they click the Create New User button – they will be directed to our three-tabbed standard registration page which looks like the example below (this particular organization has Sub Orgs and additional information defined):
|

|
|
Some customers like to have the registration details all on one tab. They might also want to add disclaimer wording, or they might just want to incorporate some of their own branding.
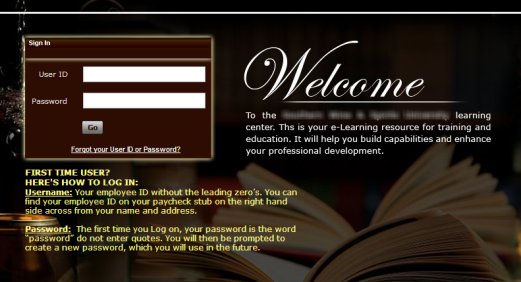
Here is an example of what one customer has done with their unique customer branding:
If you wish to create a custom login page or registration page for your CourseMill site, you can do so by using an authoring tool such as Lectora. The following pages show you the step by step instructions on how to do this.
First create a data entry form in Lectora. From the Add menu, select Object > Form Object > Form.
This will create a form item in the Title Explorer – let’s call it LoginForm.

Next, go to the properties of the object, LoginForm, and on the General tab make sure you have Submit form to CGIprogram and Submit results to is set to userlogin.jsp (or the full path to the userlogin.jsp)

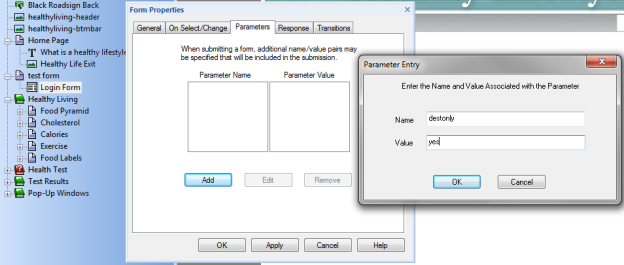
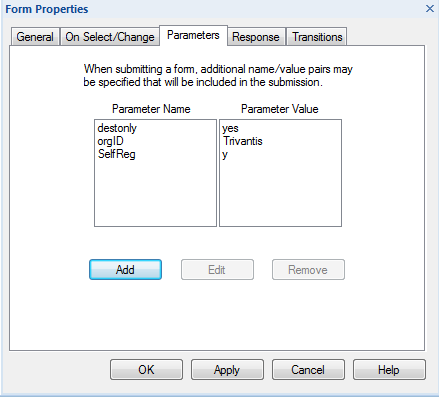
On the Parameters tab be sure to make a parameter named destonly and the value set to yes.
If you are also using this form for registration, add two additional Parameter Names:
orgID and the value will be your org ID
SelfReg with the value of y
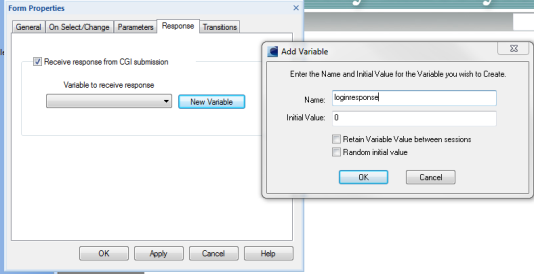
In the Response tab make sure to check Receive response from CGI submission and create a new variable called loginresponse.
Now that the form is created, you will need to specify the fields for which you want the user to enter in as login/registration data that you wish to collect.
Right-click and select New > Object > Form Object > Object Name
You will then be able to select various types of data entry formats:
Radio button- Enables users to select a specified option. When radio buttons are contained within a radio button group, users will only be able to select one of the radio buttons. Possible values are the label of the Radio button.
Radio button group- Have no physical representation on a page. Radio button groups are used to group individual radio buttons. When a set of radio buttons is placed within a radio button group, the user will only be able to select one of the radio buttons within the group.
Check Box- Enable users to select and clear a specified option. Possible values are “on” or null.
Entry Field- Enable users to type a value. Possible values are anything that the user can fit into the Entry field.
Drop-Down List- Enable users to select a value from a list of pre-defined values. Possible values are the values defined in the drop down list.
List Box- Enable users to select one or more values from a list of pre-defined values. Possible values are any selectable item, and/or multiple of the selectable items in the list.
All field names and variable names must be labeled as shown below, including the case of the name or variable.
Login Box
The only values that are needed are:
user- The userID of the person to login
password- The password of the person to login
Registration area
Below are possible values that can be included during registration.
Note * indicates a required field.
Assuming you have added a Submit button to the form, you will need to perform the following:
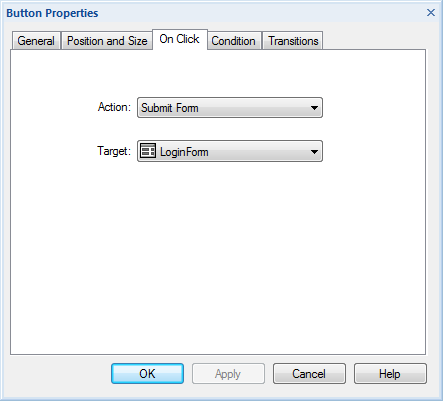
Set up the Submit button to submit the data correctly. In the On Click tab for the Submit button, select Submit Form and select the name of your form as shown below.
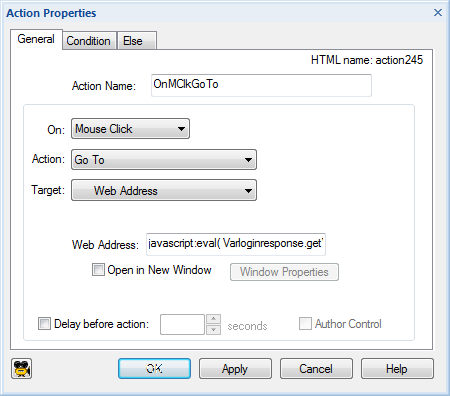
Create another action under the form to navigate the user to the proper place in CourseMill by entering the following: javascript:eval( Varloginresponse.getValue());
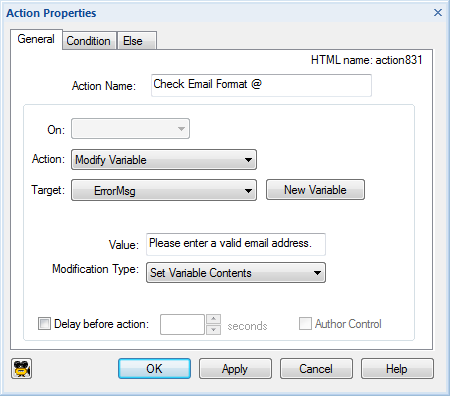
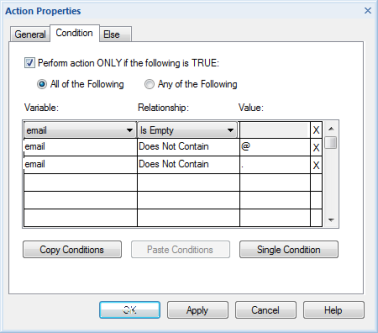
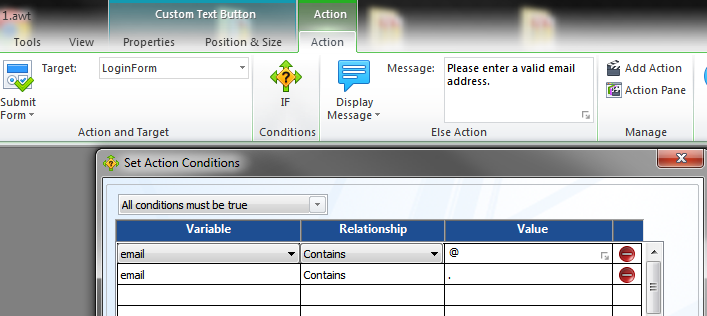
You also may wish to verify some of the data before you allow the form to navigate them to CourseMill. There are many different ways to validate form values before a user submits information. For instance, E-mail addresses should always have a ‘@’ and a period. If that is not so, you would want to include an action like the one below, that would show an error message.
Condition:
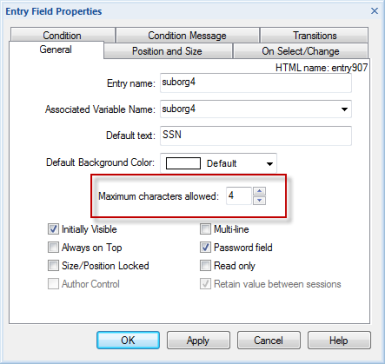
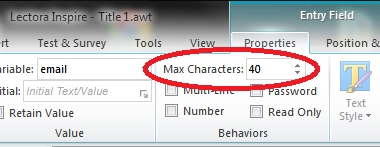
You may also wish to validate by limiting the form field character length as shown:
Once all pages in your Lectora title are set, publish to HTML and post on your site. Your IT support person can help move it to the proper place on the server.
Feel free to check out our sample Login Template at our Google Docs library - Custom Login Template under Samples for Customers folder.
In CourseMill’s Organization Setup, if a client allows Self-Registration as shown below:
Then CourseMill’s standard login page will contain a Create New User button to allow new users to set themselves up in CourseMill.
Once they click the Create New User button – they will be directed to our three-tabbed standard registration page which looks like the example below (this particular organization has Sub Orgs and additional information defined):
|
|
|
|
Some customers like to have the registration details all on one tab. They might also want to add disclaimer wording, or they might just want to incorporate some of their own branding.
Here is an example of what one customer has done with their unique customer branding:
If you wish to create a custom login page or registration page for your CourseMill site, you can do so by using an authoring tool such as Lectora. The following pages show you the step by step instructions on how to do this.
First create a data entry form in Lectora. From the Add menu, select Object > Form Object > Form.
This will create a form item in the Title Explorer – let’s call it LoginForm.
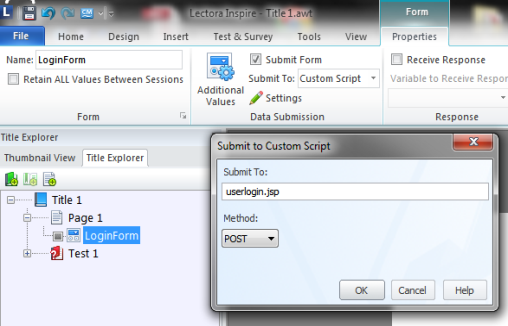
Next, with LoginForm selected in the Title Explorer, go to the Form Properties in the ribbon and make sure you have the
Submit Form box checked and Submit To is set to Custom Script. Then click  Settings and add
userlogin.jsp (or the full path to the userlogin.jsp) to the Submit To field in the Submit to Custom Script dialog. Leave the Method set to POST.
Settings and add
userlogin.jsp (or the full path to the userlogin.jsp) to the Submit To field in the Submit to Custom Script dialog. Leave the Method set to POST.
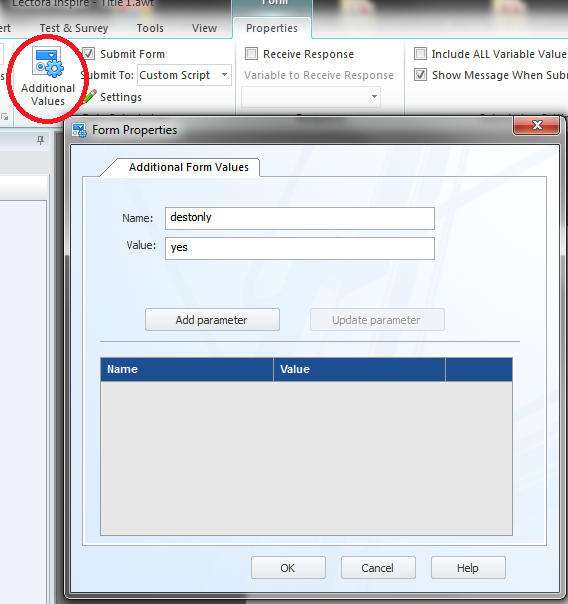
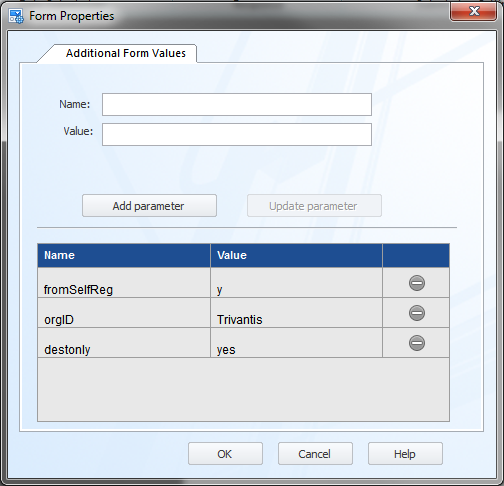
Click the Additional Values button in the Form Properties dialog. Create a parameter named destonly and set the value to yes.
If you are also using this form for registration, add two additional parameter names:
orgID and the value will be your org ID
fromSelfReg with the value of y
Back in the Form Properties check the Receive Response box and select New Variable. Create a new variable named loginresponse.

|

|
Now that the form is created, you will need to specify the fields for which you want the user to enter in as login/registration data that you wish to collect.
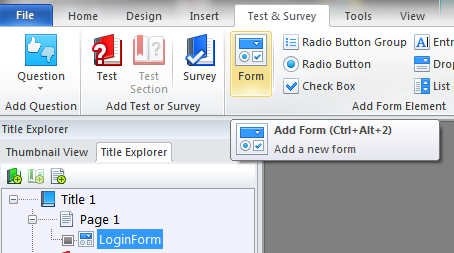
Open the Test & Survey ribbon.
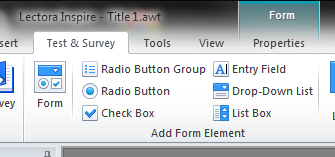
You will then be able to select various types of data entry formats:
Radio button group- Have no physical representation on a page. Radio button groups are used to group individual radio buttons. When a set of radio buttons is placed within a radio button group, the user will only be able to select one of the radio buttons within the group.
Radio button- Enables users to select a specified option. When radio buttons are contained within a radio button group, users will only be able to select one of the radio buttons. Possible values are the label of the Radio button.
Check Box- Enable users to select and clear a specified option. Possible values are “on” or null.
Entry Field- Enable users to type a value. Possible values are anything that the user can fit into the Entry field.
Drop-Down List- Enable users to select a value from a list of pre-defined values. Possible values are the values defined in the drop down list.
List Box- Enable users to select one or more values from a list of pre-defined values. Possible values are any selectable item, and/or multiple of the selectable items in the list.
All field names and variable names must be labeled as shown below, including the case of the name or variable.
Login Box
The only values that are needed are:
user- The userID of the person to login
password- The password of the person to login
Registration area
Below are possible values that can be included during registration.
Note * indicates a required field.
Assuming you have added a Submit button to the form, you will need to perform the following:
Set up the Submit button to submit the data correctly. In the On Click tab for the Submit button, select Submit Form and select the name of your form as shown below.
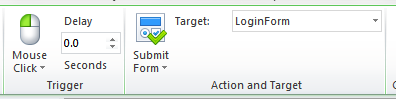
Create another action under the form to navigate the user to the proper place in CourseMill by entering the following: javascript:eval( Varloginresponse.getValue());
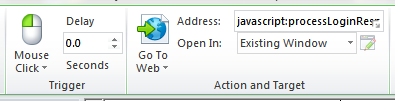
You also may wish to verify some of the data before you allow the form to navigate them to CourseMill. There are many different ways to validate form values before a user submits information. For instance, E-mail addresses should always have a ‘@’ and a period. If that is not so, you would want to include an action like the one below, that would show an error message.
You may also wish to validate by limiting the form field character length as shown:
Once all pages in your Lectora title are set, publish your title to HTML and post it on your site. Your IT support person can help move it to the proper place on the server.
Check out our sample Custom Login Page Lectora Title under Samples for Customers.
Support | About Trivantis
© Copyright Trivantis Corporation 2016