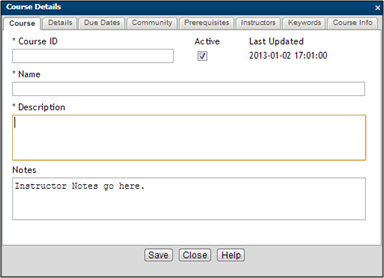
A course in CourseMill is like a container into which the course content will be uploaded. Each Course ID is unique to the site and may be assigned to individual students or to groups of students in a Sub-Org. As an administrator, you define the rules of the course and grant permissions to the instructors/reporters who can manage the course and its content.
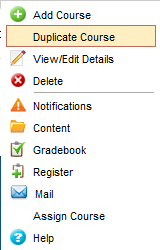
The Manage Courses menu ribbon provides the following options:
| Add Course | Opens the Course Details window to build the framework of the course and its functionality. | ||
| View/Edit Details | Opens the Course Detail for an existing course. | ||
| Delete |
Deletes a course.
|
||
| Notifications | Provides the ability to turn on/off pre-set, customizable notifications regarding the workflow for a course. These notifications will be sent to the student using the email system that was selected for the course, from the Instructor’s email address. If there is no Instructor, the email will come from the system administration email address. | ||
| Content | Provides loading of SCORM/AICC content, creation or additional non-SCORM/AICC content, or posting of course related files (resources). | ||
| Gradebook |
Allows instructors the ability to change the student’s status or score in a course. |
||
| Register | Allows instructors/reporters (who have been given permission) to register students or organizational groups in the course. | ||
| A messaging system between course instructors and students. Based on CourseMill’s set-up, it allows email attachments. | |||
| Assign Course |
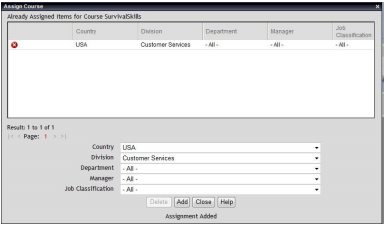
Permits re-occurring assignment of courses to entire organizational groups as they are created within CourseMill. For example, you may want to assign all users in the ACCTG sub-org to the Accounting_Adv course. Any new user that is added and defined in that sub-org will automatically become enrolled which will display that course in their My Courses tab on the student interface.
|
||
| Help | Provides access to the Help documentation. |

The Search area at the top of the screen provides the ability to easily find courses when the list of courses becomes too large. Use the controls as follows:
| Org ID | Org ID under which the course is registered. |
| Course ID |
Enter any combination of letters/numbers to search for any courses that contain that combination in the Course ID. For example, if you have two courses, one with an ID of “Accounting” and the other with an ID of “FingerPaint”, your search for “ing” will display both courses. |
| Title | Enter any combination of letters/numbers to search for any courses that contain that combination in the title. For example, if you have two courses, one with a title of “Accounting 101” and the other with a title of “Biology 101” your search for “101” will display both courses. |
| Description |
Enter any combination of letters/numbers to search for any courses that contain that combination in the description. For example, if there are two courses, one with a description of “Accounting basics to get you started” and the other with a description of “Biology basics to get you started” your search for “started” will display both courses. |
| Include Inactive | Enable this check box to expand your list to include not only the active courses, but also the inactive ones (those without a checkmark in the Active check box. For more information, see Adding a Course below. |
Courses are unique to the site by Course ID which is used to select and sort CourseMill courses in catalogs and reports. A management naming convention should be devised to organize courses based on the Course ID. For example, “ACCT_Budget_Structures” would sort all Accounting courses by the pre-fix ACCT.
Any administrator, instructor or reporter who has been given the permission, can add courses. To add a course to your organization, select Manage Courses on the left navigation bar, then click the Add Course button.

Complete the following course information to define your course.


|
By default, when you add a course, a session will automatically be created. This default session will initially be named “Web Based” with a location of “Online”. You can choose to change that to your liking, however, do not delete it. Every course must have at least one session. If a course does not have at least one session, you will run into problems. |
|
|
|
|
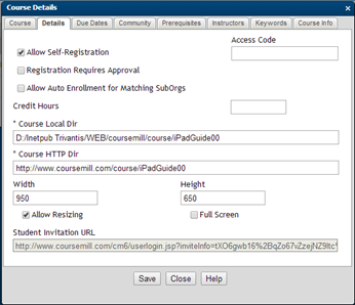
Allow Auto Enrollment for Matching SubOrgs allows you to auto enroll groups of people by SubOrgs.
You must have the managed property AutoEnrollAssignedCourses enabled for this to work.
If this is checked, any users matching the SubOrgs defined by the rules set up on the Assign Course tab will be automatically enrolled in the course. If you have no assigned rules set, no one will be auto-enrolled. See "Assign Course" further down in this document.
If this is unchecked but you still have rules set up in the Assign Course tab, those users will be the only ones to see this course in their catalog so they can self-register.
Credit Hours allows for credit to be earned for the course. Credit Hours may be credit or CEUs.
Course Width and Height can be changed to accommodate different screen sizes. This is usually adjusted for mobile courses.
Student Invitation URL – This URL is automatically generated and can be used to copy and paste in an email if you wish to send out invites to students to take the course. This URL will take them directly to the CourseMill logon screen to allow them to log in and will then direct them to the catalog to enroll in the course. It does this by placing the CourseID in the Catalog ID search field to only display that course when displaying the course catalog.
|
|
The system will automatically set the Course Local Dir and the Course HTTP Dir which specifies the server content location. The Content screen size and display rules define their operation in a browser window. The defaults for Course Local Dir and Course HTTP Dir are set in the Manage Properties. |
|
|
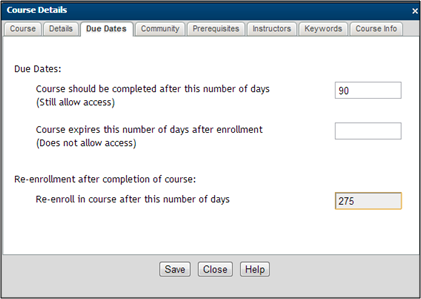
Re-Enroll in course after this number of days indicates this is a certification program that is good for only a period of time, and you wish to automatically re-enroll users to ensure they continue their certification on an on-going basis. Enter in the number of days that you want CourseMill to re-enroll the student after the student has completed the course. If there are no days entered in this field, the re-enrollment will not occur.
In the above example, a student is taking a Project Management certification course. They should be re-enrolled 275 days (9 months) after the day they complete the course (because we want to give them 3 months to prepare for next year’s certification). They should complete the course in 90 days. If they do not – we can send them a warning notification that they should be completing it soon (See Course Notifications below). But if they do not complete it in time, they will still have access to the course until they complete.
Other Samples:
| When the student chooses to certify themselves |
Date Enrolled |
Date Completed (even though it usually takes 90 days). Certification good for one year. |
Re-Enrollment Date (275 days later) |
Days to work on the course to re- certify for the next year. |
|---|---|---|---|---|
| Debbie: Jan – Dec | 1/1/14 | 2/20/14 | 11/20/14 |
3 months |
| Mike: Mar – Feb | 3/1/14 | 3/30/14 | 12/30/14 |
3 months |
| John: June – May | 6/1/14 | 8/15/14 | 5/15/15 |
3 months |
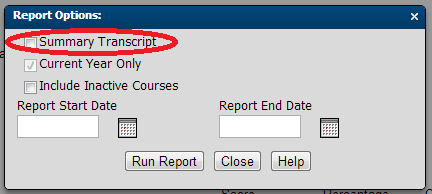
When a student is re-enrolled into a course by the system, their transcript will note this activity. Be aware that the transcript defaults to showing a summary which will not show that specific re-enrollment activity. In order to see re-enrollment activity, be sure to click the Options button, uncheck the Summary Transcript check box and then click the Run Report button to reproduce the transcript.
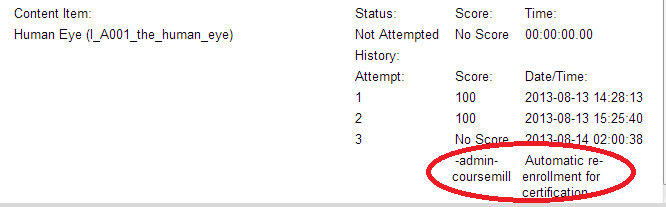
The Automatic re-enrollment for certification comment can be seen here under the specific course:
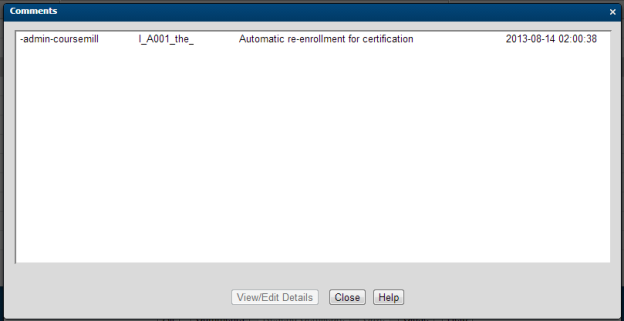
This same message can also be seen in the student’s Gradebook by selecting the little comment icon next to the course name as shown here:

Clicking the comment icon brings up the course Comment window.
|
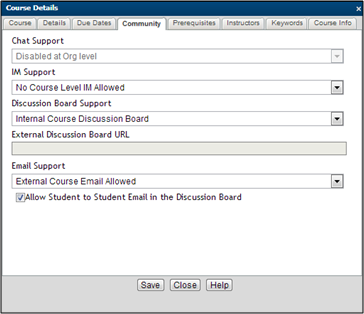
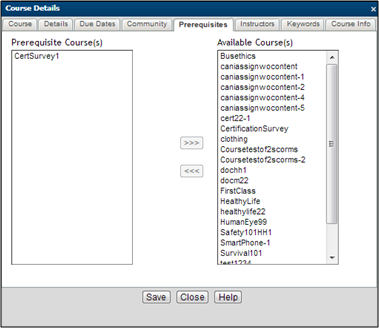
The Community feature restricts communication to only those users registered in the course.
|
|
|
|
|

|
|
|
|
Course or curriculum keyword comparison tracking is available to administrators through Curriculums/Courses > Manage Keywords. |
|
This tab will only display if the administrator has set up categories for courses in the Manage Org area. The categories set up for courses will display here (for example, Author) so data can be filled in for this particular course. Up to eight categories can be defined at the organization level. This data is only available in custom reporting that you create.
|

|
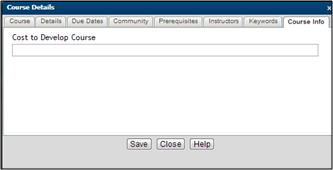
Course Info can be used for administrative tracking for each course. |
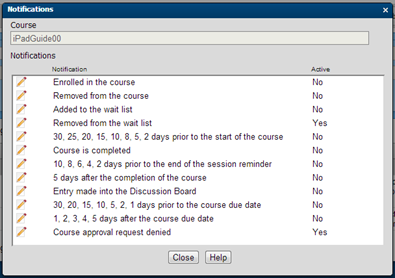
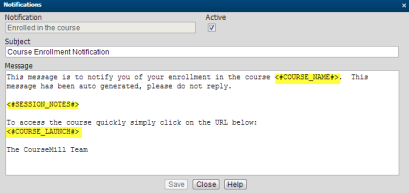
There are 11 types of course notifications.
|
|
||
|
|
|
|
|
|
|
If the typical user does not have an email address, use the manager’s email in the student’s profile to alert or distribute the messages or set CourseMill email to be Internal Only allowing the user to read email messages when they log in. If turned on, seven of the 12 notifications are sent immediately upon the corresponding action. For example, when a student is enrolled in a course the corresponding notification is sent immediately. This is true if the Instructor/Administrator performs the enrollment, or the user self-enrolls. This is also true if existing users are Auto-Enrolled as well as future students that will match the Auto-Enrollment rules. However, the other five notifications are scheduled for distribution by setting up a managed property directing CourseMill when to send the notification. They are actually sent during the nightly Notification Maintenance run Admin Tasks > Manage Scheduled Tasks > Notification Schedule). These five are shown below with their corresponding managed property that the administrator will need to set up. |
| Notification |
Managed Property |
|---|---|
| Nn,nn,nn,nn prior to the start of the course |
CourseNotificationDays – specifies the nn values |
| Nn,nn,nn,nn prior to end of session reminder |
SessionEndWarningDays - specifies the nn values |
| Nn days after completion of the course |
SessionFollowUpDays - specifies the nn values |
| Nn,nn,nn,nn prior to the course due date |
DueDateApproachingDays - specifies the nn values |
|
DueDateWarningThresholdDays – specifies the number of days prior to the due date that the Yellow/Red visuals show up in the My Courses area |
|
| Nn,nn,nn,nn after the course due date |
DueDatePassedDays - specifies the nn values |
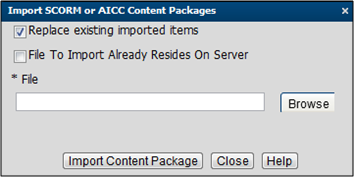
Follow these steps to set up a course:
Import content package
Add content/gradebook item
Add Resources
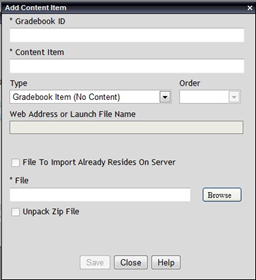
Courses can be set up with a variety of content items (SCORM/AICC courses, Word, Excel, Powerpoint, for example). There are over 300 file types that CourseMill will accept.
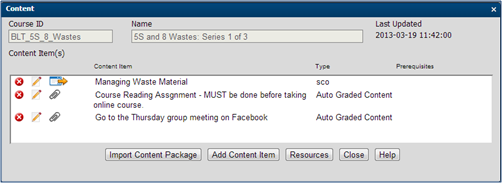
Shown below is an example showing a variety of items and how they can be utilized inside a course.
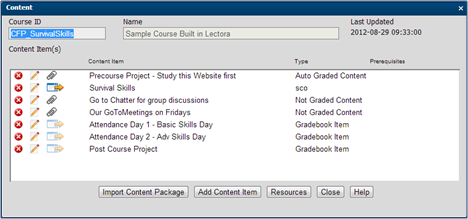
Here is a breakdown of the list of items in the example:
Pre-work that needs to be done first by simply studying a particular website. Once the student clicks on the launch (paperclip symbol) to go to this website, the system will auto-grade it as complete.
The actual Survival Skills SCORM course that will be scored according to the course content and SCORM standards as the student takes the course.
An invite to a chatter session for the group to collaborate.
A Weekly GoToMeeting invite.
There are two days the class gets together to practice basic and advanced skills. Here the Instructor simply tracks their attendance by marking that item complete when the meeting is over and they have attended.
The class has a project to perform before they will pass this course. Once this project is manually turned in to the instructor, the instructor can then grade it.
|
|
|
|
|
|
|
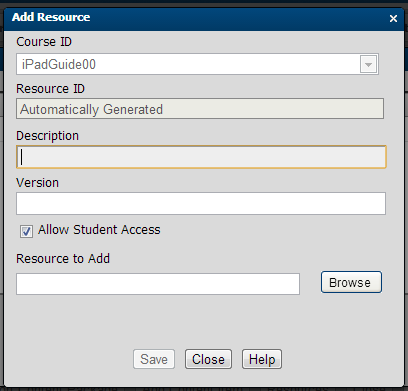
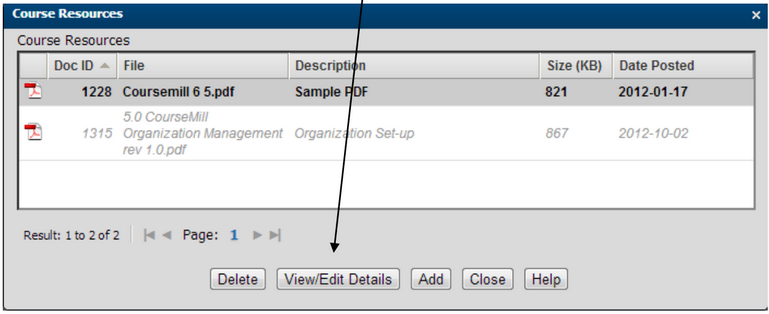
You can attach resources to your courses so participants in the course will have access. These resources are not graded and therefore do not correspond to the completion of the course. For example, this could include a document with assignment descriptions, a course syllabus, or any other supplemental information course participants should have. Make sure the file format is accessible by the applications on the users' devices.
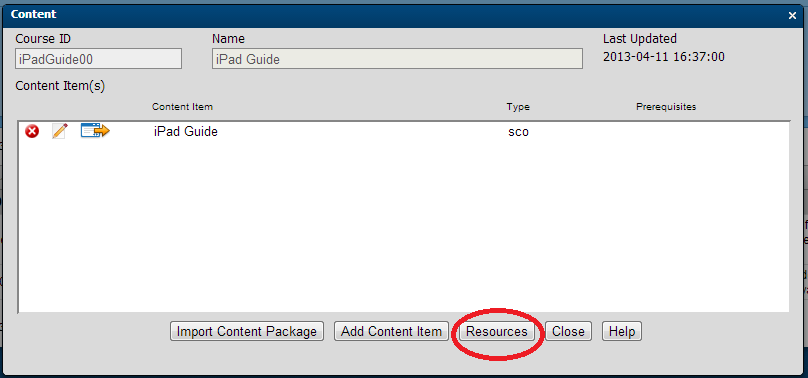
To add a resource, select the Resources button on the course Content dialog.
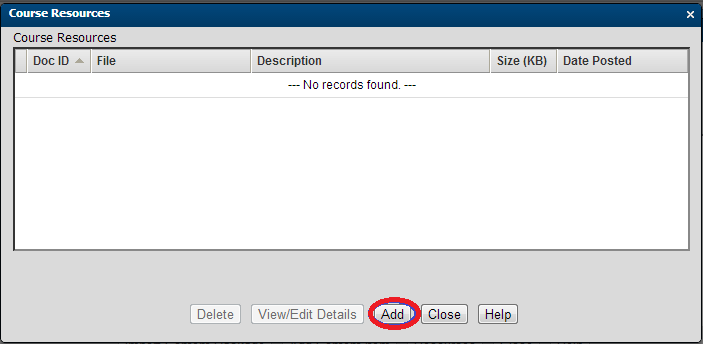
Then click the Add button.
|
|
Once resources are loaded you can click View/Edit Details to make any changes.
|
|
If a student has not opened (viewed) a resource, from within the course on the My Courses tab, an icon will display to the right of the resource stating that it is new and will stay there until the document is actually read.
If a resource was updated since the last time the user opened (viewed) it, there will be an icon to the right of the resource stating that it had been updated.
|
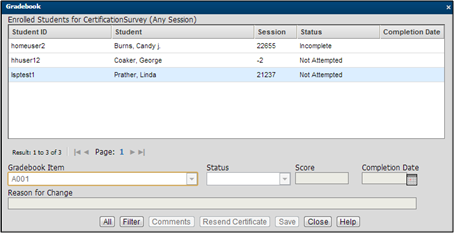
In general, you should typically grade students in sessions, not courses. A student should always be registered into a valid session. If not, it is because he hasn't enrolled in a session, yet, and therefore not ready for grading anyway. See Note below.
All students registered in the course will display in the Gradebook. You can narrow the list down by using the Filter button.
|
|
|
|
If you happen to see a session ID such as -1 or -2, it means that either the session that the user was previously enrolled in no longer exists (-1), or that the user is registered for the course but has not selected a session yet (-2). You should first wait until the student has chosen a session or correct the problem before trying to grade – as entering grades for a student in a -1 or -2 session will not work. |
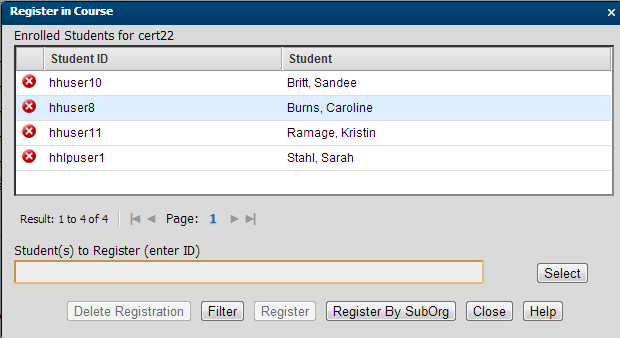
In general, one should always register students in sessions, not courses, if that is possible. If that is not possible because the student needs to select the session, and you wish to register students at a course level, continue reading. Make sure the course does, indeed, have a session associated with it before you register. If not, the student will be asked to enroll in a session when launching the course, and no sessions will display.
|
Anyone who has permission to register students can do so here.
|
|
|
Use the red  icon to remove users from the list. When removed all enrollment records for this course for the user will
be removed from CourseMill. Use this with caution as the records cannot be recovered. icon to remove users from the list. When removed all enrollment records for this course for the user will
be removed from CourseMill. Use this with caution as the records cannot be recovered. |
|
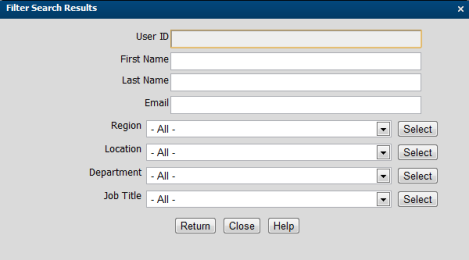
The Filter button will allow you to drill down even further by selecting a particular user by entering in one of four fields or SubOrg values. For instance, you might want to find those with the first name of George. This feature helps you quickly find people. |
|
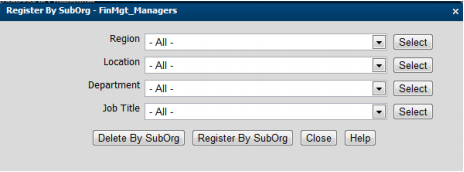
When registering by SubOrg, select one or more values for each SubOrg and then select Register by SubOrg or Delete by SubOrg. Delete by SubOrg will delete that group of students and essentially un-register them, losing all their course history. |

|
|
|
Anyone who has permission to register students can do so here.
|
|
|
|
This table shows various scenarios you might have in auto-enrolling courses. This assumes you have:
Turned ON the Managed Property, AutoEnrollAssignedCourses, and
You have set up a rule in the Assign Course area.
As described above, three very important settings come into play when auto-enrolling courses. The Managed Property settings are site wide so they affect all Orgs and can only be turned on or off by your global administrator.
|
Scenario |
Auto Enrollment for Matching Sub-Orgs Check Box |
Managed Property IgnoreSubOrgRestrictionsForCoursesInCatalog |
|
|---|---|---|---|
|
To auto enroll users in a particular sub-org and not show it in the catalog for viewing |
OFF |
YES |
NO |
|
To auto enroll users in a particular sub-org, but also allow anyone else to see it in their catalog to enroll in if they want |
ON |
YES |
YES |
|
To only show the course to a particular set of users in their catalog but allow them to enroll themselves |
ON |
NO |
NO |
|
Access using Right-Mouse Click
|
Select the Help button from within each topic of the course for context-sensitive information.
Support | About Trivantis
© Copyright Trivantis Corporation 2016