Creating accessible courses in Lectora® isn’t hard to do. In fact, with the many built-in features, options, and tools, it’s a straightforward process. The key is to keep accessibility in mind from the start as you design and develop your title. This will save you significant time in the end and prevent you from having to retrofit your title.
In this post, we’ll cover some of the more common items you’ll want to keep on your accessibility checklist as your build your course. Keep in mind, this is not a comprehensive list, and you will still need to check your title for accessibility both manually (try unplugging your mouse and using just your keyboard), using automated tools (like a screen reader or accessibility evaluation tool), and in the field with students. However, this checklist should give you a head start down the path toward more usable, accessible content.
Accessibility Development Checklist
- Web Accessibility Settings are turned on.
As you begin to design your content, be sure to turn on the Use Web Accessibility Settings option within your Title Options on the Design Ribbon. When you select this option, Lectora will automatically enable certain features in the application that will assist you with meeting Section 508 standards and the Web Content Accessibility Guidelines 2.0 Level AA.
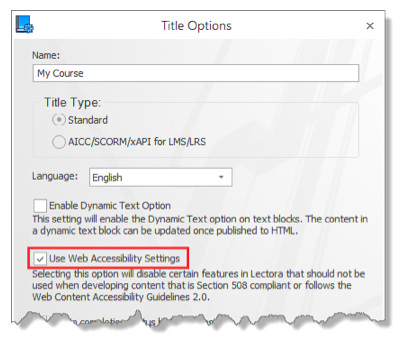
Select Title Options on the Design Ribbon to enable Web Accessibility Settings
Selecting this option modifies the following options in Lectora:
- The "Lightbox style" option is disabled for pop-up windows. This style of windows is not recognized by a screen reader. Rather, Lectora will publish with standard pop-ups that open in a new window.
- ALT tags are always published for images and buttons. ALT tags provide alternative text for assistive technology, like a screen reader, in order to interpret and announce visual content.
- Video and audio skins are disabled. Certain media players, or skins, are not accessible.
- Rollover video controllers are disabled. The rollover video option relies on a mouse and is therefore not accessible.
- The "Set Reading Order to Last" property is enabled for groups. For example, this property allows you to place navigation buttons at the title level but set them to be read last. This way you can take advantage of inheritance, but override typical reading order behavior.
- The "Language" property is enabled for text blocks. Using this property, you can let a screen reader know that a specific text block is different from the default language of the page. This is useful if you are using multiple languages in the same course.
- Visible focus indicators are displayed in web-based publishes. This is a requirement of the WCAG 2.0 AA guidelines. A bright orange outline will be displayed for any element on the page that can receive focus, like an entry field, checkbox, or button.
- A language is declared for the title and any necessary text blocks.
Use the Language drop-down in the Title Options dialog to specify the default language for your title. This will default to the language you chose when you installed Lectora.
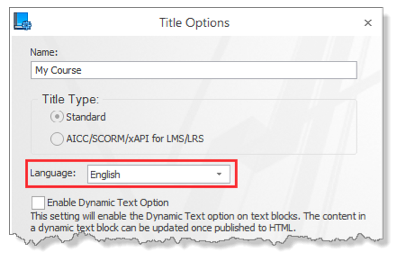
Set the Title’s language if it differs from the installed language for Lectora.
- Layering order is correct on each page.
The Title Explorer controls the layering of objects on a page, and therefore the reading order that screen readers use to identify objects.
An object at the top of the list in the Title Explorer is actually on the bottom-most layer of the page. A screen reader would identify this object first. Alternatively, an object at the bottom of the list of objects in the Title Explorer would be identified last.
Remember that objects that are inherited on a page are always identified first and layered at the very bottom of that page. A screen reader will first identify inherited title level objects, then identify inherited chapter level objects second, and identify page level objects last.
You can check the reading order simply by reviewing the Title Explorer from top to bottom.
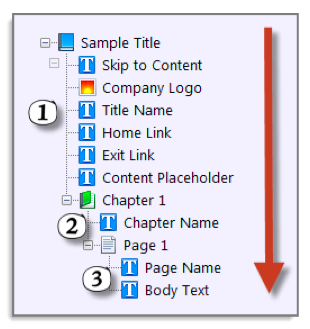
Lectora’s Title Explorer reflects the layering order.
* Use caution when setting the Always On Top property for an object. This option places the object on the top-most layer of the page and at the same time, makes it the first object identified by a screen reader.
- ALT Tags (object names) are used for images, media, buttons, and hotspots.
Accessibility guidelines require that a text equivalent is provided for every non-text element provided. You can provide text equivalents in Lectora by using ALT tags for images, buttons, and multimedia.
ALT Tags in Lectora are created from the object's name as it is listed in the Title Explorer. The name used in the Title Explorer is the same name that appears in the Name field of the object's properties. Use short, descriptive object names to create ALT tags for images, buttons, animations, and media.
If you’re layering transparent buttons on top of images to create hotspots or rollovers, ensure that the ALT tags for all of the transparent buttons (as well as the underlying image) have appropriate ALT tags as well.
The name of the object in the Title Explorer used as the ALT Tag.
- ALT Tags are turned off for decorative images.
If any of the images in your title are of no informational value or are used merely for decoration, they should have empty ALT tags. For example, this might apply to background images and shapes.
Screen readers and assistive technology will skip over objects with empty ALT Tags. You can set this in Lectora by selecting the Empty ALT Tag option in the object's properties to properly turn off ALT tags for an image. Don’t leave the object name blank or a screen reader will end up reading the image’s filename instead.

Select Empty ALT tag from the Properties Ribbon for decorative images.
- Descriptions are available for complex graphics.
Complex graphics, charts, and images will require a longer description than what you can provide with an ALT Tag. Rather than using an ALT tag, you will need to provide access to a textual description. There are many ways to do this in Lectora:
- You can layer the description behind the graphic, so it is only recognized by a screen reader but not displayed on the page. Use a small font and a text color that matches the background color of the page. Then layer it behind the image.
- Describe the image within your page's text. This benefits all learners by reinforcing the information presented in the graphic.
- Add a hyperlink below the image to open a textual explanation in a new window. You can use a Display Message action and type the long description in the Message

The hyperlink in this example opens a message with a full description of the image.
- Skip navigation link is on each page.
Accessible content means your learners have the ability to skip repetitive navigation, buttons, and links. This prevents them from having to listen to a screen reader announce each navigation element on the page before arriving at the main content.
Lectora enables you to provide a skip navigation button or link that, when executed, will automatically bring users to the main content on the page and enable the screen reader to begin announcing that content. Follow these 5 steps to create a "skip to content" link:
- Create an empty text block that will act as a placeholder object.
- In the Title Explorer, layer the placeholder before the main content.
- Add a button or hyperlink that is set to Go To > Current Page, and Scroll To the placeholder.
- Layer the “skip to content” link in the Title Explorer by placing it before any navigation.
- Use an appropriate ALT tag for the button or text for the link, such as "Skip to Content."

The skip to content hyperlink scrolls directly to the empty text block.
- Audio and video include captions and transcripts.
Accessible multimedia involves providing equivalent alternatives that are synchronized with the presentation. To accomplish this, Lectora enables you to add closed captioning to video (FLV and MP4) and audio files (MP3, FLV, and M4A) within your title.
To add closed captioning:
- Select the Add Captions button on the Video or Audio properties ribbon.
- You can import an existing XML file, or open a sample XML file to get started.
- The sample XML file can then be modified with the correct details for your media.
- Save and import the modified file to use with the video or audio.
When you preview and publish your title, the captioning text is displayed above the controller according to the details specified within an XML file.
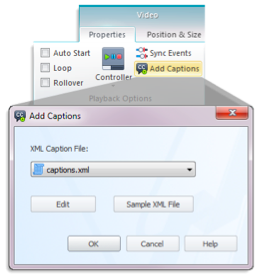
Remember to use the sample XML file as a starting point when creating your own captions.
While captioning is available for audio files, you may also choose to include a textual transcript of any audio narration you add to your title. You can display the transcript on the page, or you may link to a separate text file that opens in a new window.
- Text headers are identified for text.
Users of screen readers can search the page to find and identify important content. To enable this, you can mark and structure text using the HTML Text Type property. For each text block, you can set the HTML Text Type to Heading 1 through Heading 6.
When you label the text block as a heading, it is recognized by screen readers and even search engines as containing important information. This selection will not affect the formatting of the text block, but will define the importance of the text relative to the content. In order of importance, H1 comes first, then H2, and so on.
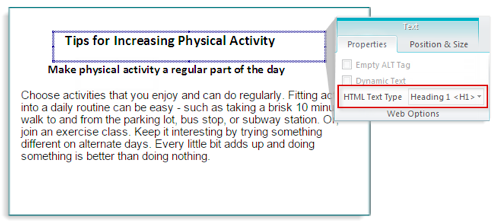
Set the HTML Text Type for important text on the page.
- Header rows are identified for tables.
If you use tables within your titles, accessibility guidelines require you to identify row and column headers so that a screen reader can properly identify the information within the table.
In Lectora, you can select the Include Header option within the Table Properties. This will identify the first row as the header. Items within the table are then automatically associated with the left-most column of the table and the identified header row.
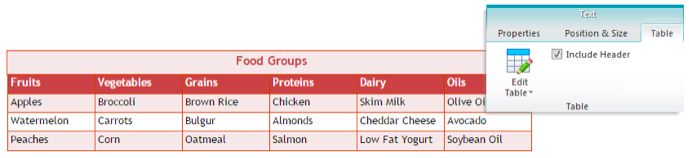
The Include Header option is on the Table properties ribbon.
- Labels are used for form elements and questions.
Most questions and form elements are already accessible, but there are a few design considerations to keep in mind.
For example, all form controls like radio buttons and entry fields require a label so that learners can identify the name and function of the control. Radio buttons and check boxes automatically include a Label property you can use to enter a descriptive label. They are added directly to the page. However, drop-down lists, list boxes, and entry fields require a different method. You will need to add a Text Label from the Test & Survey Ribbon. Then use the Label for option within the Text Properties to associate the label with the correct form element.
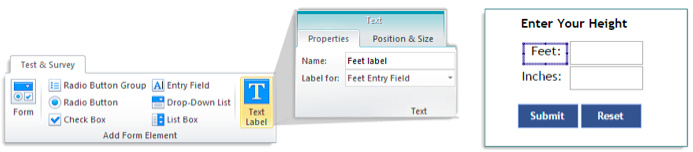
In this example, the Feet Text Block is set to be a label for the Feet Entry Field.
Since radio buttons, check boxes, entry fields, and other form elements are used to make up the parts of a question, it’s helpful to know which questions can be used in accessible titles. Generally, the question text or question choice will serve as the label for the form control.
The following questions are accessible and require no additional work:
- True/False
- Multiple Choice
- Multiple Response
- Likert
- Essay
- Short Answer
- Fill in the Blank
- Number Entry
- Rank/Sequence
* Remember to place labels close to their corresponding form elements on the page. If a learner is using a screen magnifier, it should be easy to determine which label identifies which form control.
- The Accessibility Check Tool does not return any unintended errors.
As you go through the process of designing and developing your title, you can take advantage of Lectora’s Accessibility Check tool. Keep in mind this tool should not be used as the final indicator in determining whether or not your title is 508 or WCAG compliant. No automated tool can fully accomplish what a person can do with a manual test.
Instead, the Accessibility Check tool can be used to help identify objects within your title that may require special attention in order to comply with the 508 requirements or Web Content Accessibility Guidelines. For example, while the tool cannot determine if you have provided the appropriate synchronized captions for your title, it will provide a warning indicating that you may need to address your multimedia objects.
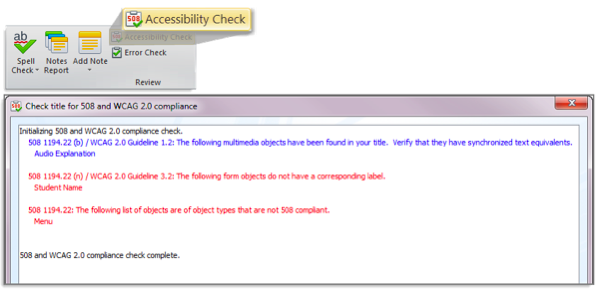
Run the Accessibility Check tool often as you develop your title.
When viewing the items listed in the Accessibility Check tool, note that blue items are only warning messages, while red items are errors. You can double-click the message to jump to the page containing the object identified in the message.
Now you can create your own accessibility development checklist to keep on hand as you develop your next accessible title.