A lot of people have been asking me how to use custom fonts in Lectora® eLearning software, so I decided that a final and ultimate guide is in order. It covers two major steps:
1. getting the fonts into Lectora for the developer and
2. making sure your learners can see the fonts regardless of their device or browser.
Ok, where do I get the fonts?
The biggest sources for free fonts are Google Fonts and Font Squirrel. They offer so many great looking fonts that I personally never felt a need to buy one. Of course, if you are working with a designer or with your client’s marketing department, they will supply the font for you.
What font format do I need?
In most cases you will get a TTF or OTF font file. However, not all browsers will be able to understand those, so you have to use Font Squirrel Webfont Generator to generate all necessary font formats. We’ll get to that.
How do I use the font in Lectora?
Exit Lectora, right-click on the TTF font file, choose Install, wait until it’s done and re-launch Lectora. Your new font should be selectable among other fonts. Create a textbox and try it out. Hit F9 to preview the results in browser.
Will my learners be able to see it?
Not unless they have installed the font file like you just did. Realistically, you cannot expect them to, so let me walk you through three embedding solutions.
Solution One
If you are really short on time, you can convert all texts to images. Just check the Convert To Image box in the textbox properties. This is an easy and bullet-proof option, but it comes with a price. Your course becomes heavier due to hundreds or even thousands of new image files, and the text does not look very nice on high-resolution devices such as newer iPads. Also, learners will not be able to copy texts, although some of you may view this as an advantage.
Solution Two
The good guys at Google have done a lot of work for you, so if you are okay with using assets that are located outside your LMS, you can use Google Fonts. If not, refer to Solution Three below.
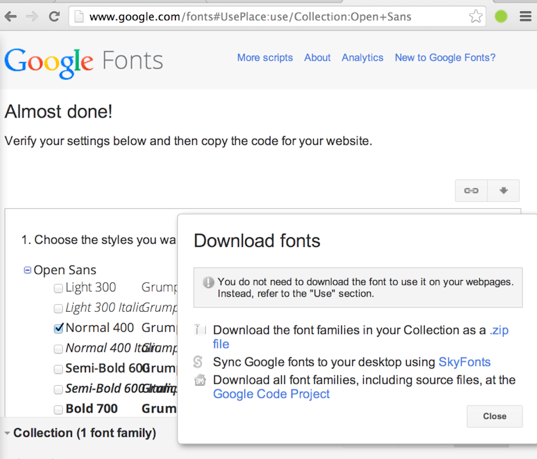
1. Go to Google Fonts and select a font you like. Click on the little arrow to download the zip file and install the TTF (right click, Install). You can now use it in Lectora to build your course.
2. In Lectora, add an External HTML Object at the top title level. Set it to Meta tags, click Edit and type in the following text:
<link rel="stylesheet" type="text/css" href="http://fonts.googleapis.com/css?family=Tangerine">
Of course, you should replace “Tangerine” with whatever font you have chosen from Google Fonts Collection. That’s it! Publish your course and test it on a device that doesn’t have this font installed. If you did everything right, the course will download the font from Google on the fly and display it.
Solution Three
My company cannot have anything loaded from 3rd party servers. Also, I didn't find a good font on Google but I have this TTF file from my marketing manager. Can I still use custom fonts?
Of course. You will have to embed web fonts into your course. Follow these steps:
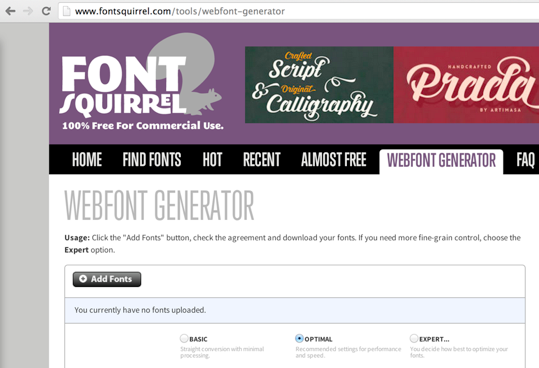
1. Go to Font Squirrel’s Webfont Generator, upload your TTF file and get a zipped webfont package.
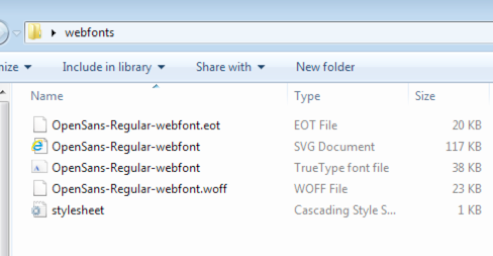
2. Unzip the package. You will only need five files out of it: the four font files (EOT, SVG, TTF and WOFF) as well as the stylesheet.css file. Put all of them into a folder called “webfonts” somewhere, e.g. on your desktop. We will use it later.
3. This step is optional, and you might not need it. Sometimes Font Squirrel will use a font family name that is different from what you see in Lectora, e.g. “open_sansregular” vs. “Open Sans Regular” (note the space). You can fix it. Open the stylesheet.css file in Notepad. It will look something like this:
@font-face {
font-family: 'open_sansregular';
src: url('OpenSans.eot');
src: url('OpenSans.eot?#iefix') format('embedded-opentype'),
url('OpenSans.woff') format('woff'),
url('OpenSans.ttf') format('truetype'),
url('OpenSans.svg#opensansregular') format('svg');
font-weight: normal;
font-style: normal;
}
Just edit the second line to match the font name you see in Lectora, so it looks like this:
@font-face {
font-family: 'Open Sans Regular';
src: url('OpenSans.eot');
src: url('OpenSans.eot?#iefix') format('embedded-opentype'),
url('OpenSans.woff') format('woff'),
url('OpenSans.ttf') format('truetype'),
url('OpenSans.svg#gooddogregular') format('svg');
font-weight: normal;
font-style: normal;
}
Don’t change other lines and be careful with those quote marks and semicolons. Now save the file and launch Lectora.
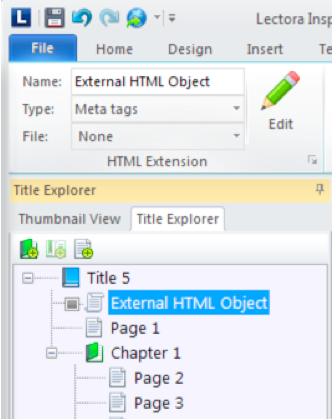
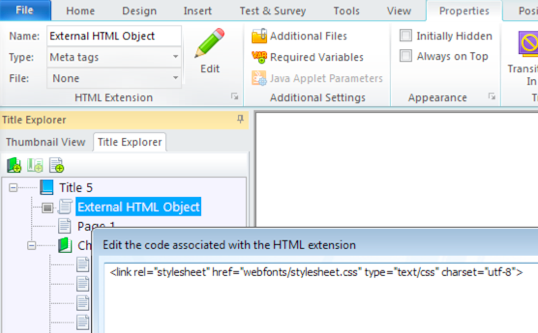
4. In Lectora, add an External HTML object on the top level of your title. Set it to “Meta tags” type.
5. Select the HTML Object, click Edit and enter the following text
<link rel="stylesheet" href="webfonts/stylesheet.css" type="text/css" charset="utf-8">
6. Select the HTML Object, click Add additional files, click Add folder and select the webfonts folder you've created before.

7. Publish the title to SCORM or HTML and view it on a device that doesn't have the custom fonts installed. If you did everything right, the fonts should look exactly like on your own PC.
Sign up for a free trial of Lectora to try this yourself!